Re-Engineering Assessment Practices in Scottish Higher Education
Software Installation and PowerPoint Integration
The following page was originally developed by e-Learning@UBC
Windows Installation
- Download the InterWrite PRS software. (4.40.0005 - August 2007 version - release notes)
- Install the software by running the IWPRS_4400005.exe file.
- Click Next. This should lead to the License Agreement window. Accept the license agreement, click Next.
- Click on the Install button. The software should start installing.
- Once the program has been installed you should find the PRS software in your Start Menu > All Programs > InterWrite PRS > PRS
- Now, you can go ahead and create clicker-enabled questions.
- When you are ready to present, plug in the clicker receiver to your PC (or exporting your lesson file to an in-class clicker-ready computer).
Note: If a Windows hardware wizard pops up, follow these steps:
- Select No, not this time. Then click Next.
- Select the Install the software automatically option, then click Next.
- A hardware installation window will pop up. Choose the Continue Anyway option, and then click Finish.
Macintosh Installation
- Download the Mac InterWrite PRS software here. (4.40.0005 - August 2007 version - release notes)
- Double click on the downloaded .Zip file to unzip the program. Then, double click on InterWrite PRS file to install the program.
- Click Next. This should lead to the License Agreement window. Accept the license agreement, click Next.
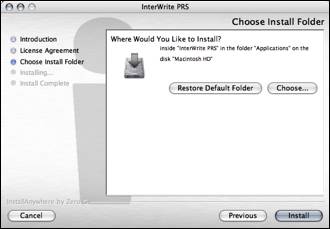
- Click on the Install button. The software should start installing.
- After the installation finishes, you can run the program by looking under the Applications folder on your Macintosh hard drive.
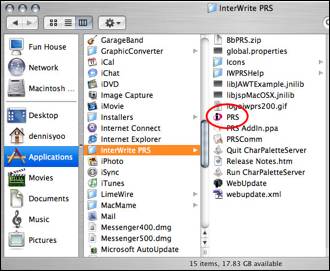
- Double click on the PRS file to run the program.
To start PRS presentation
- Plug in the Clicker receiver to your computer via an available USB port.
- Run the PRS program.
- A window should pop up. Choose the desired class to run and click OK.
- For additional information, please review the manual.
Setting up PowerPoint plugin
Windows Users
- The software automatically installs a plug-in for PowerPoint. When you run PowerPoint the PRS toolbar will be available.
![]()
Mac Users
- Open PowerPoint. Under the PowerPoint menu, click on Preferences
- Under the View tab, uncheck Project Gallery at startup option. Click OK.
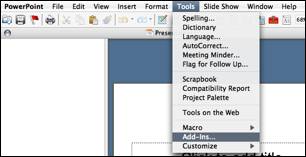
- Under the Tools menu choose Add-ins.
- Click on the Add button.
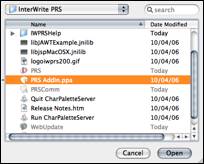
- In the resulting 'Choose an Add-In window', navigate to Applications > InterWrite PRS, and select the PRS AddIn.ppa file. Click Open.
- A warning should pop up. Click on the Enable Micros button.
- In the Available add-ins box should be a checked box with the PRS Addin.pda file in it. Click OK. Restart PowerPoint to see the new PRS toolbar.
Last modified: